A moisture meter helps you detect dampness inside walls before mold starts to grow, protecting your home’s health. It works by measuring moisture levels using pin or pinless sensors, giving quick, non-invasive results. Properly preparing your walls, knowing what moisture levels mean, and testing regularly are key to preventing damage. Keep reading to learn how to use one effectively and keep your home safe from hidden moisture.
Key Takeaways
- Use a moisture meter to detect hidden dampness in walls before mold develops.
- Choose between pin-type and pinless meters based on wall surface and testing needs.
- Prepare walls by cleaning and drying to ensure accurate moisture readings.
- Conduct multiple tests across different spots and interpret readings to identify elevated moisture levels.
- Regular testing after leaks or high humidity helps prevent mold growth and structural damage.

Klein Tools ET140 Pinless Moisture Meter for Non-Destructive Moisture Detection in Drywall, Wood, and Masonry; Detects up to 3/4-Inch Below Surface
WATER LEAK DETECTOR detects relative moisture content from leaks and flooding
As an affiliate, we earn on qualifying purchases.
As an affiliate, we earn on qualifying purchases.
What Is a Moisture Meter and How Does It Work?
Have you ever wondered how to accurately measure moisture levels in materials? That’s where a moisture meter comes in. It’s a handy tool used for damp detection and moisture analysis, helping you identify hidden dampness before it causes damage. A moisture meter works by sending either an electrical signal or infrared energy into the material. The device then measures how much moisture is present based on the response. There are different types, such as pin-type meters that penetrate surfaces and pinless meters that scan without damaging the material. By understanding moisture content, you can prevent mold growth and structural issues. Knowing the measurement process ensures you get accurate readings for effective moisture management. Additionally, selecting the right moisture measurement method is vital for obtaining reliable results in various building materials. To enhance accuracy, understanding the watt-hours capacity of your moisture meter can help you choose a model suitable for your needs. Regular calibration of your device is also important for maintaining measurement accuracy over time. Proper moisture detection techniques can save you money and effort in the long run. Overall, a moisture meter provides quick, reliable readings essential for maintaining the health of your home or building.
Klein Tools ET140 Pinless Moisture Meter for Non-Destructive Moisture Detection in Drywall, Wood, and Masonry; Detects up to 3/4-Inch Below Surface
WATER LEAK DETECTOR detects relative moisture content from leaks and flooding
As an affiliate, we earn on qualifying purchases.
As an affiliate, we earn on qualifying purchases.
Which Type of Moisture Meter Is Best for Your Home?

Choosing the right moisture meter for your home depends on the specific tasks you need it for. If you’re inspecting walls for dampness, a pin-type moisture sensor provides precise moisture detection by measuring electrical resistance through probes. It’s ideal for pinpointing areas with higher moisture levels. For quick, non-invasive assessments, a pinless or pin-free moisture meter is best; it uses electromagnetic signals to scan surfaces without damage. These are useful for scanning larger areas or delicate materials. Consider your budget, the surfaces you’ll test, and whether you prefer contact-based or non-contact readings. Both types serve different needs, so select the one that best matches your home’s requirements for accurate moisture detection and effective damp wall identification. Additionally, understanding nail biology and care can help you better interpret moisture readings around areas with nail installations or repairs. Being aware of moisture measurement principles can improve your ability to select the most suitable device for your specific situation. Knowing how material composition affects moisture readings can also help you avoid false positives or negatives in your assessments. To enhance your understanding, consider the advantages of different moisture meter types to choose the most effective tool for your inspection needs. Furthermore, understanding appropriate calibration techniques ensures your readings remain accurate over time.

General Tools MMD4E Digital Moisture Meter, Water Leak Detector, Moisture Tester, Pin Type, Backlit LCD Display With Audible and Visual High-Medium-Low Moisture Content Alerts, Grays
HUMIDITY SENSOR: Our handy meter tool can quickly determine what level of remediation is needed to keep your…
As an affiliate, we earn on qualifying purchases.
As an affiliate, we earn on qualifying purchases.
How Do You Properly Prepare Your Walls for Moisture Testing?
Before testing your walls for moisture, make sure to clean the surface thoroughly to remove dust and debris. Next, remove any loose or peeling paint to guarantee accurate readings. Finally, dry the wall completely to prevent moisture from skewing the results. Additionally, ensuring a stable cabling setup can help prevent false readings caused by electrical interference. Proper testing procedures also contribute to reliable results and accurate detection of dampness. Incorporating proper calibration techniques ensures the moisture meter provides precise measurements and avoids errors. Regularly inspecting your walls for hidden leaks can further help prevent moisture buildup and mold growth. Understanding regional flavors and how they influence moisture levels can also be beneficial in comprehensive wall assessments.
Clean Surface Thoroughly
To make certain accurate moisture readings, you need to start by thoroughly cleaning the wall surface. A clean surface ensures no dirt or debris interfere with the proper cleaning needed for precise testing. Follow these steps:
- Wipe the wall with a damp cloth to remove dust and surface grime.
- Use a mild detergent solution for stubborn stains or grease, then rinse with clean water.
- Dry the wall completely with a towel or cloth to avoid moisture interference during testing.
- Ensuring the wall surface is free of contaminants helps prevent false readings and guarantees more reliable moisture detection. Additionally, a well-prepared surface can help identify hidden dampness that might not be apparent initially.
Proper cleaning removes any contaminants that could skew your moisture meter readings. It also helps you get an accurate assessment of existing dampness without false positives. Remember, a clean surface is essential for reliable moisture testing results and effective dampness detection.
Remove Loose Paint
Since loose or peeling paint can interfere with accurate moisture readings, it’s important to remove any unstable paint layers before testing. Paint peeling indicates areas where the wall’s surface isn’t secure, which can skew moisture meter results. To ensure proper wall preparation, carefully scrape away all loose or flaking paint using a putty knife or paint scraper. Be thorough, but avoid damaging the underlying surface. After removing the peeling paint, wipe the wall with a damp cloth to remove dust and debris. Properly prepared walls provide a stable, even surface for moisture measurement, ensuring your readings are accurate. Additionally, surface stability is crucial for preventing false readings caused by uneven surfaces or loose materials. Ensuring proper testing conditions helps achieve reliable moisture testing results. Maintaining a clean and smooth surface also minimizes the risk of measurement interference, leading to more dependable results. Proper wall preparation is essential for reliable moisture testing, ensuring you accurately detect potential issues before mold develops.
Dry Wall Completely
After removing loose paint and debris, the next step is to guarantee the wall dries completely. Properly drying the drywall is essential for an accurate moisture meter reading and effective drywall inspection. To do this:
- Allow plenty of time for air circulation or use a dehumidifier to reduce moisture trapped in the wall.
- Ensure any existing moisture barrier, such as plastic sheeting, is intact and properly installed to prevent future dampness.
- Confirm the wall feels dry to the touch and test with a moisture meter in multiple spots before proceeding.
This step helps you identify the true moisture level and prevents false readings caused by residual dampness. Proper drying ensures reliable results and a thorough drywall inspection.
General Tools MMD4E Digital Moisture Meter, Water Leak Detector, Moisture Tester, Pin Type, Backlit LCD Display With Audible and Visual High-Medium-Low Moisture Content Alerts, Grays
HUMIDITY SENSOR: Our handy meter tool can quickly determine what level of remediation is needed to keep your…
As an affiliate, we earn on qualifying purchases.
As an affiliate, we earn on qualifying purchases.
How Do You Use a Moisture Meter on Walls Step-by-Step?

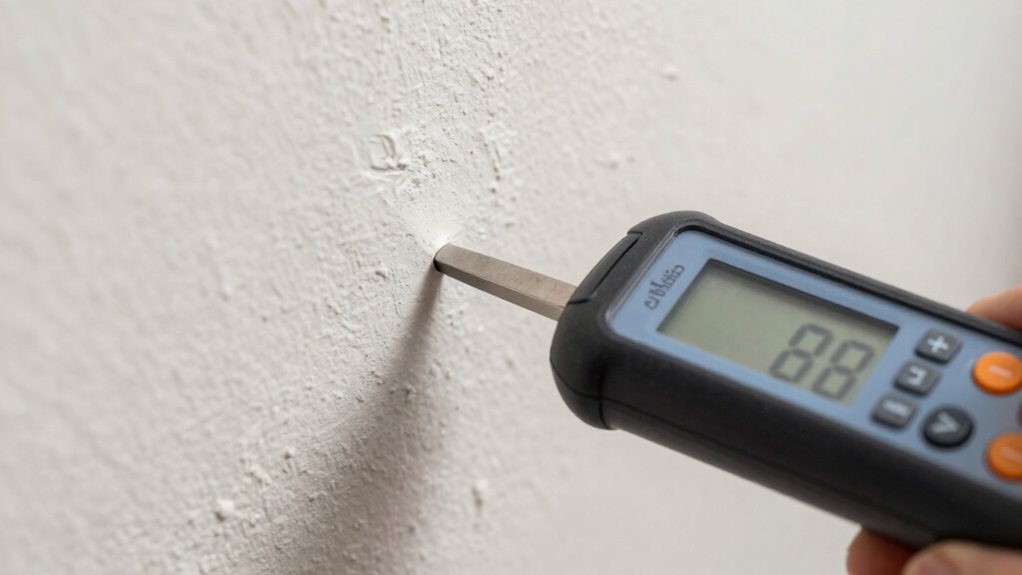
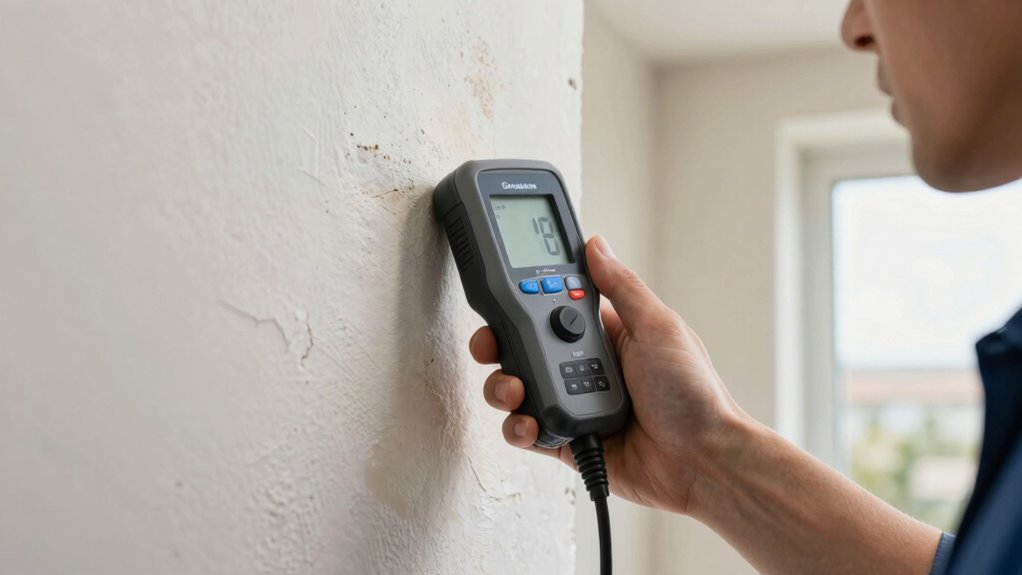
Using a moisture meter on walls is straightforward if you follow the proper steps. First, select the appropriate type of meter—pin or pinless—based on your wall texture. For textured walls, pinless meters work better as they scan a larger area without damage. Turn on the device and calibrate it according to the manufacturer’s instructions. Press the meter’s probes firmly against the wall, ensuring good contact, especially in areas with uneven surface textures. Move the meter across the wall to get readings at different spots, paying attention to areas where moisture absorption might be higher. Record the readings and compare them to normal moisture levels. This process helps you identify damp spots before mold starts, giving you a clear picture of your wall’s condition.
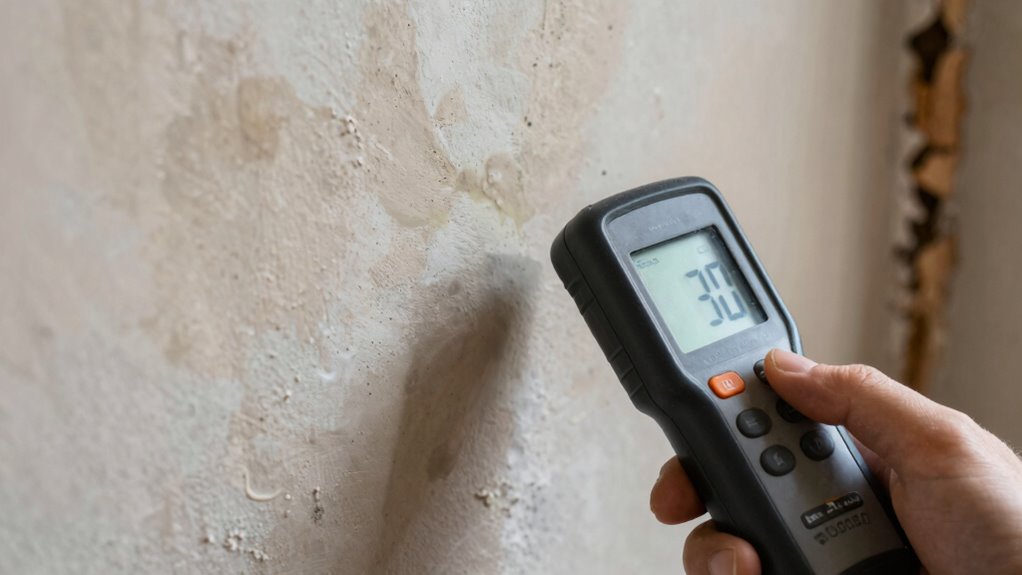
What Do Moisture Levels Indicate About Your Walls?

What do your moisture readings really tell you about your walls? High wall moisture indicates excess humidity levels, which can signal potential problems. When moisture levels are elevated, it suggests that your walls might be absorbing or trapping water, risking mold growth. Here’s what your readings reveal:
- Normal levels: Typically below 12%, indicating your walls are dry and stable.
- Elevated levels: Between 12-20%, pointing to increased humidity that needs monitoring.
- High moisture: Above 20%, signaling significant wall moisture and a possible damp problem.
Consistently high moisture levels mean your walls are retaining water, which can lead to structural issues or mold if unchecked. Monitoring wall moisture helps you maintain a healthy, mold-free environment.
What Common Mistakes Should You Avoid When Testing for Moisture?

When testing for moisture, one common mistake is not properly calibrating your moisture meter before use. This oversight can lead to inaccurate readings, which are a major pitfall in testing accuracy. Always calibrate your meter according to the manufacturer’s instructions, especially if you’re testing different materials. Ignoring this step can cause you to misjudge moisture levels, potentially overlooking hidden dampness or overestimating dry areas. Another common pitfall is relying solely on one reading; moisture can vary within a small area. Be sure to take multiple readings at different points for a reliable assessment. Additionally, avoid testing in areas with surface contaminants or extreme temperatures, as these factors can skew results. By avoiding these mistakes, you ensure more precise, trustworthy moisture detection.
How Can You Detect Hidden or Hard-to-Reach Moisture Areas?
Detecting hidden or hard-to-reach moisture areas requires more than just a standard moisture meter reading on the surface. Hidden leaks and inaccessible areas can conceal moisture that leads to mold and damage. To uncover these, try these methods:
- Use a moisture meter with penetrating or pin sensors to check deeper layers or behind walls.
- Employ infrared or thermal imaging cameras to identify temperature differences caused by moisture buildup.
- Look for signs like discoloration, musty odors, or peeling paint that indicate moisture presence behind surfaces.
These techniques help you locate moisture in concealed spots, ensuring you don’t miss hidden leaks or moisture pockets in inaccessible areas. Detecting these early prevents mold growth and costly repairs later.
When Should You Test for Moisture, and How Often?

Regular moisture testing is essential during key times to prevent hidden damage and maintain a healthy environment. Timing considerations include checking after heavy rain, plumbing leaks, or flooding, as these events can cause rapid moisture buildup. It’s also wise to test periodically in humid seasons or if you notice any signs of dampness or mold. Testing frequency depends on your home’s condition; in high-risk areas like basements or bathrooms, monthly checks may be necessary. For stable environments, quarterly or biannual testing might suffice. Consistent monitoring helps catch moisture problems early, preventing mold growth and structural damage. Remember, understanding when to test and how often keeps your home safe and helps you address issues before they escalate.
How Can You Combine Moisture Meter Readings With Visual Checks?

Combining moisture meter readings with visual inspections creates a more all-encompassing approach to identifying potential moisture problems. Visual cues like discoloration, peeling paint, or mold spots can signal underlying moisture issues. To enhance accuracy, follow these steps:
- Check for visual cues that indicate dampness, such as water stains or mold growth.
- Use your moisture meter to measure moisture levels in areas showing these visual signs.
- Compare moisture readings with the visual cues to establish a moisture correlation, confirming if dampness is present.
This combined approach helps you pinpoint problems more precisely, preventing unnecessary repairs and catching issues early before mold develops. Visual signs and moisture levels together provide a clearer picture of your wall’s condition, guiding effective action.
How Using a Moisture Meter Helps Prevent Mold Growth and Protect Your Home?

Using a moisture meter helps you detect hidden moisture in walls and floors before it becomes visible. This early detection prevents mold from taking hold and spreading throughout your home. By catching issues early, you protect your property and maintain a healthier living environment.
Detecting Hidden Moisture
Detecting hidden moisture is essential because it can lurk behind walls, under floors, and within insulation, often unnoticed until it causes significant damage. Moisture migration and humidity intrusion can quietly weaken structures and promote mold growth. Using a moisture meter helps you identify these issues early on. Here’s how it works:
- You can pinpoint areas with elevated moisture levels that are invisible to the naked eye.
- It reveals moisture migration paths, showing how humidity intrusion travels through your home.
- Early detection allows you to address moisture problems before mold spores develop, saving you money and effort.
Preventing Mold Development
Have you ever wondered how to keep mold from taking hold in your home? Using a moisture meter helps you identify damp areas early, preventing mold before it starts. When you detect moisture levels that are too high, you can take prompt action to dry out walls and reduce humidity. Improving ventilation is key; it increases air quality by reducing indoor humidity that fosters mold growth. Proper airflow helps keep moisture levels in check, making your home less inviting to mold spores. Regularly monitoring moisture with a meter allows you to maintain ideal conditions, protecting your walls and your health. By staying vigilant and enhancing ventilation, you create a less hospitable environment for mold, safeguarding your home and improving overall air quality.
Frequently Asked Questions
Can Moisture Meters Detect Mold or Only Moisture?
Moisture meters detect moisture levels in walls and surfaces, but they don’t directly detect mold. By identifying damp areas early through moisture detection, you can prevent mold growth before it starts. Using a moisture meter helps you monitor potential problem spots, allowing you to take action and reduce mold risk. So, while it doesn’t find mold itself, it’s a valuable tool for mold prevention by keeping moisture levels in check.
Are Digital or Analog Moisture Meters More Accurate?
Think of choosing a moisture meter like picking a compass; precision guides your way. Digital meters often offer better calibration, making them more consistent across measurements. Analog meters, however, excel in accuracy with their straightforward needle readings. If you want reliable, easy-to-read results, digital meters are usually the better choice thanks to their digital calibration, but for simplicity and direct feedback, analog meters still hold their ground.
How Deep Can a Moisture Meter Measure Inside Walls?
Your moisture meter can typically measure up to ¾ inch to 2 inches deep, depending on the device and wall thickness. For thick walls, you might need a pin-type meter with a greater measurement depth. Keep in mind that the accuracy decreases as you go deeper, so knowing your wall’s thickness assists you in selecting the right meter and ensures reliable moisture readings for detecting dampness before mold develops.
Do Moisture Levels Vary With Different Wall Materials?
Walls wonder with varied importance—yes, moisture levels do differ with wall material differences. You’ll find that moisture absorption rates vary considerably; some materials like drywall absorb moisture quickly, while brick or concrete resist it longer. By understanding how different wall materials respond to moisture, you can accurately measure and monitor dampness, preventing mold and damage before they start. Stay vigilant, and your walls will thank you with durability and dryness.
What Is the Ideal Moisture Level to Prevent Mold Growth?
You should aim for a moisture level below 20% to prevent mold growth. Maintaining proper humidity control helps keep this level steady, reducing the risk. Keep in mind that wall permeability affects how moisture moves through your walls; more permeable materials may require more vigilant monitoring. Use a moisture meter regularly to track levels and confirm your walls stay dry, effectively preventing mold before it starts.
Conclusion
Remember, an ounce of prevention is worth a pound of cure. Regularly using a moisture meter helps you catch damp walls early, preventing mold before it starts. By staying proactive and keeping an eye on moisture levels, you protect your home and your health. Don’t wait for visible damage—trust your meter, stay vigilant, and keep your walls dry. After all, a dry home is a happy home.