
To install a moisture barrier under carpets yourself, start by testing the subfloor’s moisture levels with a simple moisture meter. Choose a durable, moisture-resistant material like polyethylene sheets or vapor barriers, cutting it to fit your space. Lay the barrier flat, overlapping seams by at least six inches, and seal them securely with tape or adhesive. Guarantee the barrier is continuous and free of gaps. Stay tuned to learn detailed steps to protect your flooring effectively.
Key Takeaways
- Test the subfloor’s moisture levels with a moisture meter before installing the barrier.
- Choose a durable, moisture-resistant barrier material like polyethylene or a vapor barrier.
- Roll out the barrier flat, overlapping seams by at least six inches, and seal them with tape or adhesive.
- Cut around doorways, vents, and corners precisely to ensure a tight, seamless fit.
- Regularly check moisture levels after installation to ensure the barrier remains effective and the floor stays dry.
Are you ready to protect your home from moisture damage? Installing a moisture barrier under your carpets is a proactive step that can save you money and prevent mold growth. Before you begin, it’s essential to understand the importance of moisture testing. This process helps you identify areas where excess moisture might be seeping through, which is vital for effective barrier installation. Use a simple moisture meter to check the subfloor’s moisture levels in different spots. If readings are high, you’ll need to address these issues before laying the barrier. Once you’ve identified problem areas, you can select appropriate barrier materials that suit your needs.
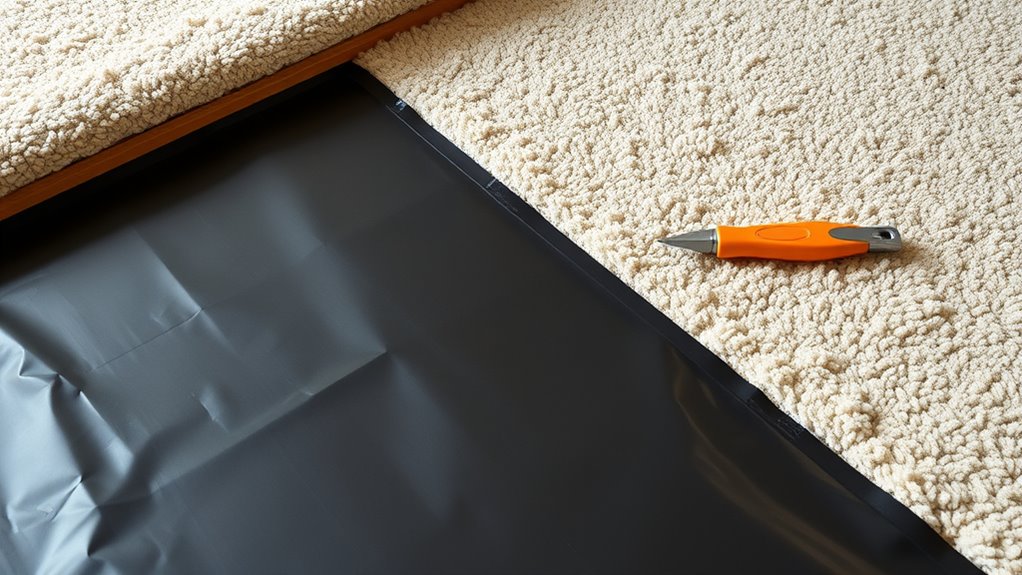
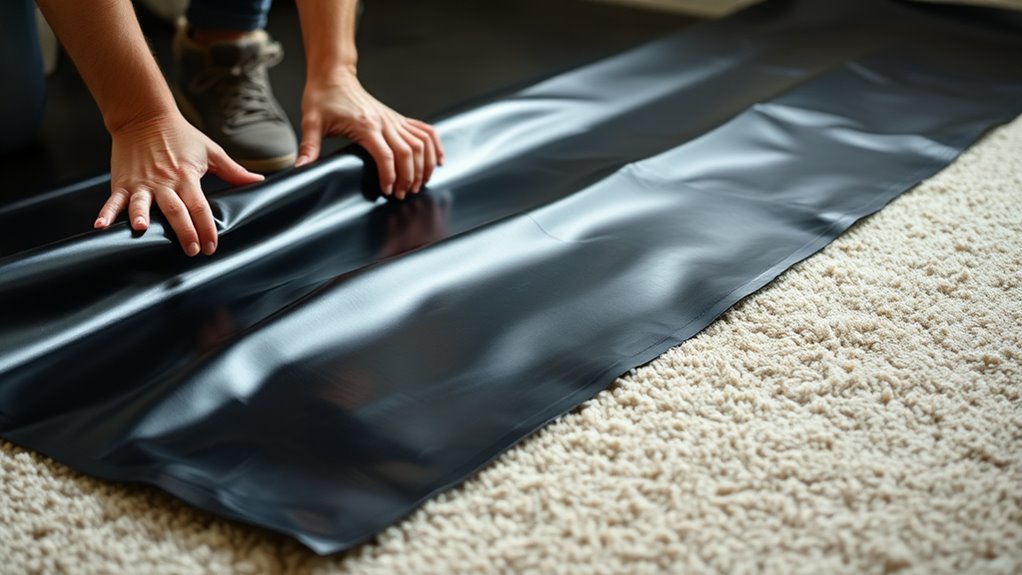
Choosing the right barrier materials is key. You’ll want products that are durable, moisture-resistant, and compatible with your flooring. Common options include polyethylene sheets, vapor barriers, or specialized moisture-proof membranes. These materials act as a barrier to prevent ground moisture from rising and penetrating your carpet and subfloor. Make sure the barrier you select is thick enough to provide reliable protection and is designed for indoor use. Properly installing these materials involves laying them flat and overlapping edges by at least six inches to ensure complete coverage. Use strong adhesive or sealing tape to secure the seams and prevent any gaps where moisture could sneak through. Understanding hydraulics and how moisture moves through soil can help you better assess your installation needs.
Choose durable, moisture-resistant barrier materials like polyethylene sheets and vapor barriers for effective protection.
Before installing the barrier, clear the area of any debris or old flooring that could interfere with a tight seal. Roll out the barrier material carefully, smoothing out wrinkles or folds that could trap moisture or cause unevenness. When you reach doorways, corners, or vents, cut the barrier material precisely so it fits snugly without overlapping or gaps. It’s important to tape down the edges securely, especially around these tricky spots, to maintain a continuous moisture barrier. This step helps prevent moisture from bypassing the barrier through small gaps or seams.
In addition to installing the barrier, consider insulating the subfloor if necessary, especially in damp or cold environments. Proper insulation can further reduce condensation and moisture buildup. Remember, the goal is to create a tight, seamless layer that keeps ground moisture from rising into your carpets and causing damage. Once everything is installed correctly, you can proceed with your carpet installation, confident that you’ve added a significant layer of protection. Regular moisture testing afterward can help you monitor the effectiveness of your barrier over time, ensuring your home stays dry and healthy. With attention to detail and the right materials, you’ll have a moisture-proof foundation that preserves your flooring and enhances your home’s durability.
Frequently Asked Questions
What Types of Moisture Barriers Are Best for Different Flooring Types?
You should choose types of vapor barriers based on your flooring. For carpets, a moisture-resistant plastic or polyethylene sheet works well, preventing ground moisture from seeping through. If you’re installing hardwood or laminate, opt for a vapor barrier with a high moisture-resistant rating, like a woven or foil-backed membrane. Always guarantee the barrier is suited for your specific flooring type to protect against moisture damage effectively.
How Long Does a DIY Moisture Barrier Installation Typically Take?
Think of your project as planting a seed—within a day, your moisture barrier can take root. Typically, the installation timeline spans 2 to 4 hours, depending on your space’s size and complexity. Preparation steps like clearing the area, measuring, and laying out the barrier set the foundation. Once these are complete, you can swiftly progress, turning a simple task into a sturdy shield against moisture.
Are There Any Safety Precautions to Consider During Installation?
During installation, you should wear personal protective equipment like gloves and a mask to avoid inhaling fumes or coming into contact with chemicals. Make certain proper ventilation in the area to prevent buildup of fumes from adhesives or moisture barriers. Keep the workspace clear of obstacles and follow safety instructions on product labels. Taking these precautions helps protect your health and ensures a safer, more effective installation process.
Can Moisture Barriers Be Reused or Relocated if Needed?
Yes, you can reuse moisture barriers if they’re still in good condition, but relocating barriers is more challenging. When reusing, make sure the barrier isn’t damaged or torn. If you need to relocate, carefully remove it without tearing, clean it thoroughly, and then install it in the new spot. Keep in mind, reusing or relocating barriers may compromise their effectiveness, so inspect them closely before proceeding.
What Signs Indicate a Moisture Barrier Failure or Need for Replacement?
If you notice moisture seepage or persistent dampness on your carpet, it’s a clear sign your moisture barrier might be failing or needs replacing. You may also see mold, a musty smell, or warped flooring. These indicators suggest the barrier isn’t effectively blocking moisture anymore. Addressing these issues promptly helps prevent further damage and maintains a healthy, dry environment in your space.
Conclusion
So there you have it—your DIY moisture barrier adventure. Who knew that laying plastic could be so thrilling? Just remember, if your new barrier doesn’t stop all the pesky moisture, you can always blame it on the damp, mysterious forces of nature. Or, you know, maybe check your work next time. Either way, now you’re officially the hero who’s defeated dampness one carpet at a time. Cheers to dry floors and triumphant DIYs!